
| 일 | 월 | 화 | 수 | 목 | 금 | 토 |
|---|---|---|---|---|---|---|
| 1 | 2 | 3 | 4 | |||
| 5 | 6 | 7 | 8 | 9 | 10 | 11 |
| 12 | 13 | 14 | 15 | 16 | 17 | 18 |
| 19 | 20 | 21 | 22 | 23 | 24 | 25 |
| 26 | 27 | 28 | 29 | 30 | 31 |
- JS setTimeout
- JS classList
- JS form action
- JS redirection
- JS 스코프
- JS preventDefault
- JS 형변환
- JS value속성
- JS 화살표함수
- JS 숫자
- JS localStorage
- js 변수
- git 협업셋팅
- HTML기초
- CSS기초
- JS setInterval
- JS form
- JS 타이머기능
- JS 데이터타입
- JS 함수
- JS typeof연산자
- JS prompt
- JS append
- JS 연산
- JS null undefined
- JS clearInterval
- JS 삼항연산
- JS 기초
- JS appendChild
- CSS속성정리
공부기록용
바닐라 JS로 크롬 앱 만들기(03) 본문
https://nomadcoders.co/javascript-for-beginners/lobby
바닐라 JS로 크롬 앱 만들기 – 노마드 코더 Nomad Coders
Javascript For Beginners
nomadcoders.co
🔴getElementById( )
🔴querySelector()
🔴addEventListener()
🔴Element.classList
🔴toggle( String [, force] )
javascript로 html불러오기
// HTML
<!DOCTYPE html>
<html lang="ko">

<head>
    <meta charset="utf-8" />
    <meta http-equiv="X-UA-Compatible" content="IE=edge" />
    <meta name="viewport" content="width=device-width, initial-sccale=1.0" />
    <link rel="stylesheet" href="style.css">
    <title>momentum App</title>

</head>

<body>
    <h1 id = "title">Grab me</h1>
    <script src="app.js"></script>
</body>

</html>
> javascript로 id = "title"을 가진 <h1>태그를 불러
이 처럼 js에서 html을 가져올 수도 있고, 이런 것들을 활용해서 값을 변경 시킬 수 도 있다.
.getElementById( ) 함수
getElementById(id)매개변수
- id : 찾을 요소의 ID입니다. ID는 문서 내에서 고유한 대소문자 구분 문자열로, 하나의 요소에만 지정된 ID가 있어야 한다.
반환 값
- Element지정된 ID와 일치하거나 null일치하는 요소가 문서에서 발견되지 않은 경우 DOM 요소 개체를 설명하는 개체다.
1. document 라는 객체는 JS에서 HTML파일을 불러올 수 있도록 도와준다
2. document의 함수 중에는 getElementById 라는 함수가 있는데, 이 함수가 HTML에서 id를 통해 element를 찾아준다

https://developer.mozilla.org/ko/docs/Web/API/Document/querySelector
querySelector(selectors)

querySelectorAll(selectors)
매개변수
- selectors : 일치시킬 하나 이상의 선택자를 포함하는 문자열입니다. 이 문자열은 유효한 CSS 선택자 문자열이어야 합니다. 그렇지 않은 경우 SyntaxError예외가 발생합니다.
- ex = document.querySelector(".hello h1") -> 'hello'라는 class안에 h1 태그를 찾아냄
반환 값
- 지정된 CSS 선택기Element 집합과 일치하는 문서의 첫 번째 요소를 나타내는 개체입니다 . 일치 하는 항목이 없으면 null 반환됩니다. 지정된 선택자와 일치하는 모든 요소 목록이 필요한 경우 querySelectorAll()대신 사용해야 합니다.
- 단 하나의 element만을 return해줌
- querySelectorAll() : 문서 내의 모든 요소 목록을 배열로 반환
- 지금 js파일이 있기 때문에 js를 통해 html의 내용을 가져올 수 있는 거임
- document가 html이 js파일을 load하기 때문에 존재 → 그 다음에 browser가 우리가 document에 접근할 수 있게 해줌
- element의 내부를 보고 싶으면 console.dir()
기본적으로 object로 표시한 element를 보여줌(전부 js object임)
그 element 중 앞에 on이 붙은 것들은 event임
- event: 어떤 행위를 하는 것
모든 event는 js가 listen할 수 있음
- eventListener : event를 listen함 → js에게 무슨 event를 listen하고 싶은 지 알려줘야 함
- title.addEventListener("click") : 누군가가 title을 click하는 것을 listen할 거임 → 무언가를 해줘야함
const title = document.querySelector("div.hello:first-child h1");

function handleTitleClick(){
    title.style.color = "blue";
}

title.addEventListener("click", handleTitleClick);
> click하면 handleTitleClick이라는 function이 동작하길 원함
> 그래서 handle~ 함수에 () 를 안넣은 것임
> 즉, js가 대신 실행시켜주길 바라는 것임!
- function이 js에게 넘겨주고 유저가 title을 click할 경우에 js가 실행버튼을 대신 눌러주길 바라는 것임( 직접 handleTitleClick(); 이렇게 하는 것이 아니라)
- 함수에서 () 이 두 괄호를 추가함으로써 실행버튼을 누를 수 있는 거임
<!-- HTML -->
<!DOCTYPE html>
<html lang="ko">

<head>
    <meta charset="utf-8" />
    <meta http-equiv="X-UA-Compatible" content="IE=edge" />
    <meta name="viewport" content="width=device-width, initial-sccale=1.0" />
    <link rel="stylesheet" href="style.css">
    <title>momentum App</title>

</head>

<body>
    <div class="hello">
        <h1>Click me!</h1>
    </div>
    <script src="app.js"></script>
</body>

</html>
const title = document.querySelector("div.hello:first-child h1")
function handleTitleClick(){
title.style.color = "blue";
}
title.addEventListener("click", handleTitleClick);
// html element를 가져와서
// addEventListener function을 실행시켜줌addEventListener(type, listener)
addEventListener(type, listener, options)
addEventListener(type, listener, useCapture)DOM객체(eventTarget). addEventListener('이벤트명_eventType', 실행할 함수명_function, 옵션)- eventTarget(이벤트 타겟)은 해당 이벤트를 적용할 DOM을 가져와 준다. DOM에서 특정 이벤트가 발생되면 우리는 JavaScript 이벤트 객체에서 이를 확인할 수 있다. DOM 구조에서 이벤트는 매우 다양하지만, 자주 쓰는 이벤트는 아래와 같다.
- 포커스 이벤트(focus, blur)
- 폼 이벤트(reset, submit)
- 뷰 이벤트(scroll, resize)
- 키보드 이벤트(keydown, keyup)
- 마우스 이벤트(mouseenter, mouseover, click, dbclick, mouseleave)
- 드래그 앤 드롭 이벤트 (dragstart, drag, dragleave, drop)
- eventType(이벤트 타입/): 어떤 타입의 이벤트를 적용할 것인지 써주면 된다. 타입을 써줄 때는 따옴표를 잊지 말고 감싸줘야 한다.
- click: 요소를 클릭하면 이벤트 발생.
- DOMContentLoaded: 페이지가 새로 로딩될 때마다 이벤트 발생.
- scroll: 스크롤을 하면 이벤트 발생.
- submit: 양식을 전송하면 이벤트 발생. (ex: input type이 submit일 때 submit 버튼을 누르는 것과 같음)
- function(실행할함수) : 해당 변수는 생략 가능하며, 해당 이벤트가 발생할 때 실행할 함수 명을 입력한다.
- 옵션: 옵션은 생략이 가능하며, 자식과 부모 요소에서 발생하는 버블링을 제어하기 위한 옵션이다.
document의 body,head,title 이런것들은 중요하기 때문에
document.body.style~의 명령이 허용되지만, div같은것들은 호출이 안됨
나머지 element들은 querySelector나 getElementById로 불러와야됨
const title = document.querySelector("div.hello:first-child h1")

function handleTitleClick(){
    title.style.color = "blue";
}

function handleMouseEnter(){
    title.innerText = "Mouse is here!";
}
function handleMouseLeave(){
    title.innerText = "Mouse is gone!";
}

title.onclick = handleTitleClick;
// title.addEventListener("click", handleTitleClick);

title.onmouseenter = handleMouseEnter;
// title.addEventListener("mouseenter", handleMouseEnter)

title.addEventListener("mouseleave", handleMouseLeave)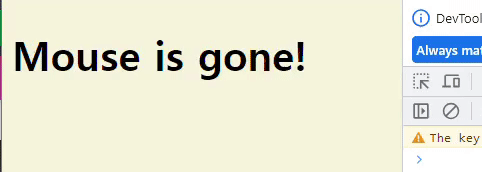
Resize
const h1 = document.querySelector("div.hello:first-child h1")

function handleTitleClick(){
    h1.style.color = "blue";
}

function handleMouseEnter(){
    h1.innerText = "Mouse is here!";
}
function handleMouseLeave(){
    h1.innerText = "Mouse is gone!";
}
function handleWindowResize(){
    document.body.style.background = "tomato";
}


h1.addEventListener("click", handleTitleClick);
h1.addEventListener("mouseenter", handleMouseEnter)
h1.addEventListener("mouseleave", handleMouseLeave)

window.addEventListener("resize", handleWindowResize)
if 추가
const h1 = document.querySelector("div.hello:first-child h1")

function handleTitleClick() {
    if (h1.style.color === "blue") {
        h1.style.color = "tomato";
    } else {
        h1.style.color = "blue";
    }

}
h1.addEventListener("click", handleTitleClick);
const h1 = document.querySelector("div.hello:first-child h1")
function handleTitleClick() {
const currentColor = h1.style.color
let newColor;
if (currentColor === "blue") {
newColor = "tomato";
} else {
newColor = "blue";
}
h1.style.color = newColor;
}
h1.addEventListener("click", handleTitleClick);
// h1.style.color = newColor;의 이유
// newColor을 빈 변수로 선언 -> 즉, 값이 없는 undefined상태
// if else를 거치게 됨
// 그 과정은 딱 처음 블루로 변해서 newColor를 토마토로 받아
// 그리고 토마토니까 else로 가면서 이때 newColor의 값이 블루로 변해
// 그래서 다시 이 일련의 과정을 다시진행하려면
// h1.style.color = newColor로 마지막에 해줌으로써 h1.style.color(블루) = newColor로 담기게 되고
// 변하지 않는 상수로 설정한
// currentColor = h1.h1.style.color(블루)이기에 다시 if문으로 돌아갈 수 있게 됨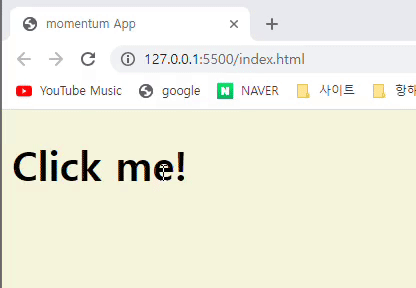
색에 대한 CSS는 따로 CSS파일에 빼주고 동작에 대한 내용만 담음
if else를 사용해서 class가 있을때와 없을때의 컬러를 다르게 설정하여 다음과 같이 반영
const h1 = document.querySelector("div.hello:first-child h1")

function handleTitleClick() {
   if(h1.className === "active"){
    h1.className = ""; // 빈값으로 바꾼다(한마디로 삭제인 셈)
   } else {
    h1.className = "active" // 다시 부여
   }

}

h1.addEventListener("click", handleTitleClick);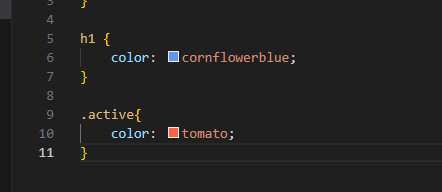

style작업에 적합한 도구는 CSS다!!
animation에 적합한 도구는 JS다!!
html 파일은 CSS문서와 JS문서를 import하고 있다.
에러를 줄이기 위해 raw string을 쓰는 대신, const를 생성하기!
JS로 모든 class name을 변경하지는 않는다.
element의 class 내용물을 조작하는 것을 허용한다.
엘리먼트의 클래스 목록에 접근하는 방식을 대체하는 간편한 방법이다.
const h1 = document.querySelector("div.hello:first-child h1")

// className
function handleTitleClick() {
    const clickedClass = "clicked"

   if(h1.className === clickedClass){
    h1.className = ""; // 빈값으로 바꾼다(한마디로 삭제인 셈)
   } else {
    h1.className = clickedClass // 다시 부여
   }
}
h1.addEventListener("click", handleTitleClick);


// classList
function handleTitleClick() {
    const clickedClass = "clicked"

   if(h1.classList.contains(clickedClass)){
    h1.classList.remove(clickedClass); // 빈값으로 바꾼다(한마디로 삭제인 셈)
   } else {
    h1.classList.add(clickedClass) // 다시 부여
   }
}
h1.addEventListener("click", handleTitleClick);

toggle 함수는 class name이 존재하는지 확인
const h1 = document.querySelector("div.hello:first-child h1")

// classList
function handleTitleClick() {

    h1.classList.toggle("clicked");
}

h1.addEventListener("click", handleTitleClick);

// h1.classList에 clickedClass의 존재 확인해서
// 만약 있다면 toggle이 clicked를 제거해줘
// 만약 h1.classList에 clicked가 존재하지 않으면
// toggle는 clicked를 clickList에 추가를 할 거야
'📚강의록📚 > 노마드)Javascript' 카테고리의 다른 글
| 바닐라 JS로 크롬 앱 만들기(06) (0) | 2023.06.29 |
|---|---|
| 바닐라 JS로 크롬 앱 만들기(05) (0) | 2023.06.29 |
| 바닐라 JS로 크롬 앱 만들기(04_2) (0) | 2023.06.28 |
| 바닐라 JS로 크롬 앱 만들기(04_1) (0) | 2023.06.28 |
| 바닐라 JS로 크롬 앱 만들기(~02) (0) | 2023.06.22 |